Every second your computer takes to boot is a second you didn’t ask for. You press the power button, go grab a coffee, come back — and Windows is still loading. Sound familiar?
The most common reason Windows 11 boots slowly isn’t the processor, it isn’t the hard drive, and it almost certainly isn’t a virus. It’s startup programs. Apps that quietly registered themselves to launch the moment Windows loads — before you’ve even touched the keyboard. Some are useful. Most are not.
In this guide, you’ll learn exactly how to disable Windows 11 startup programs the right way — using three different methods depending on how deeply embedded those programs are. I’ll also tell you which ones are safe to disable, which ones you should leave alone, and the one mistake most people make that causes more problems than it solves.
Why Startup Programs Slow Down Windows 11 So Much
When you install software on Windows 11, many apps automatically add themselves to the startup list. Spotify, Discord, Steam, Teams, OneDrive, Zoom, Adobe Updater — they all do this by default, often without asking.
Here’s why that matters: when Windows 11 boots, it doesn’t load these apps one at a time and wait for each to finish. It launches them all simultaneously. That means your processor, RAM, and disk drive are all competing to handle 10, 15, or 20 apps loading at the same time — all before your desktop is even ready to use.
The result is a slow boot, sluggish first few minutes, high RAM usage right after startup, and a fan that sounds like it’s running a marathon. On machines with 8GB of RAM or an older processor, this effect is even more dramatic.
The good news? This is one of the easiest performance problems to fix. You don’t need any paid software, you don’t need to touch the registry (unless you want to), and you can undo everything if something goes wrong.
Method 1: Disable Startup Programs via Task Manager
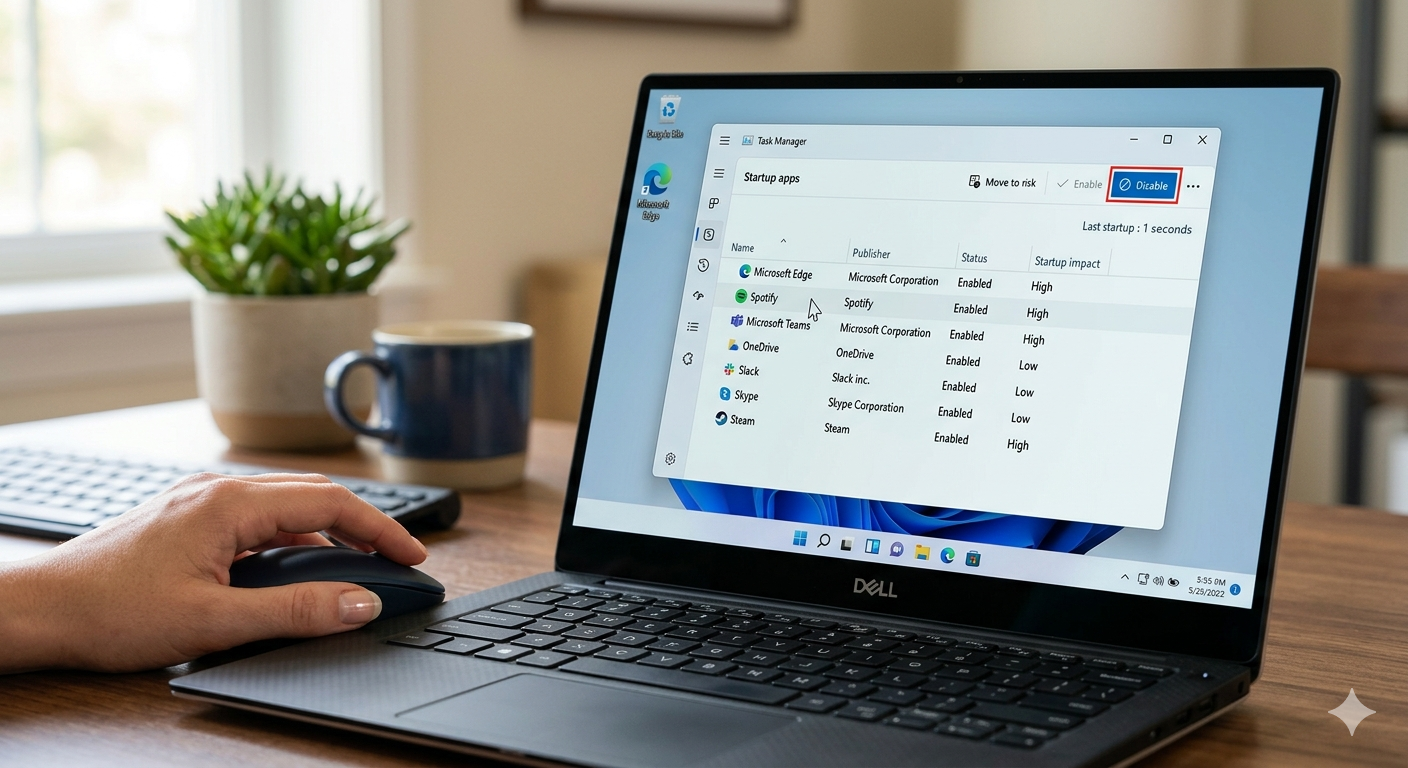
Task Manager is the fastest and safest way to manage startup programs in Windows 11. It shows you every app registered to launch at boot, tells you how much impact each one has on your startup time, and lets you disable them with a single click.
Here’s how to do it:
- Press Ctrl + Shift + Esc to open Task Manager directly
- If you see the compact view, click “More details” at the bottom
- Click the “Startup apps” tab along the top
- You’ll see a list of every program that launches at boot
Now look at the “Status” column and the “Startup impact” column. The impact column is your best friend here — it shows whether each app has a Low, Medium, or High impact on how long Windows takes to boot.
To disable a startup program:
Right-click any program in the list and select Disable. That’s it. The app is not deleted, not uninstalled, and not blocked from running — it just won’t launch automatically when Windows starts. You can still open it manually any time you want.
Work through the list and disable anything marked “High” impact that you don’t need the instant your PC boots. For most people, this includes:
- Spotify — opens it when you want music, not every time Windows starts
- Discord — launch it when you’re gaming, not at boot
- Steam — you don’t need Steam loaded before you even log in
- Zoom / Teams — unless you live in back-to-back meetings, disable these
- Adobe Updater / Creative Cloud — notoriously heavy at startup
- iTunes / Apple Push Notification — disable all Apple helper services unless you actively use iTunes
- Skype — most people don’t need Skype auto-starting in 2025
- Any manufacturer app (McAfee LiveUpdate, HP Support Assistant, Dell SupportAssist) — safe to disable unless you specifically use them
After disabling, restart your PC and measure the difference. Most users see a 30–60 second improvement in boot time after a single session of startup cleanup.
Method 2: Disable Startup Programs via Windows Settings
Windows 11 also has a built-in startup manager inside the Settings app — and it’s actually more detailed than Task Manager in some ways. It shows app descriptions and links to the publisher, which helps you identify unfamiliar entries.
Here’s how to access it:
- Press Windows + I to open Settings
- Navigate to Apps → Startup
- You’ll see a list of all startup apps with toggle switches
The toggles work exactly as expected — slide one to the left to disable, slide right to enable. Each app also shows its startup impact rating next to its name.
This method is particularly useful if you prefer a cleaner visual interface over Task Manager’s grid layout. The Settings panel also tends to show some apps that Task Manager misses — specifically Windows Store (Microsoft Store) apps that have registered for startup but don’t always appear in Task Manager’s list.
Scroll through the entire list slowly. If you see an app you don’t recognize, Google the name before disabling it. Some Windows 11 system components disguise themselves with vague names. Disabling the wrong thing is unlikely to cause serious damage — but it’s still better to know what you’re turning off.
Method 3: Disable Startup Programs via MSConfig
MSConfig — the System Configuration utility — is the old-school way to manage startup programs, and it’s still useful for things that don’t always show up in Task Manager or Settings. This is also where you can control which Windows services start at boot, not just which apps.
To open MSConfig:
- Press Windows + R, type msconfig, and hit Enter
- Click the Startup tab
- You’ll see a message: “To manage startup items, use the Startup section of Task Manager”
- Click the link to open Task Manager’s Startup tab directly. In Windows 10 and 11, Microsoft moved most startup app management from MSConfig to Task Manager. However, MSConfig is still valuable for the Services tab.
Using MSConfig’s Services tab:
- In MSConfig, click the Services tab
- Check the box that says “Hide all Microsoft services” — this is critical. Do this before touching anything
- Now you see only third-party services
- Any service here that belongs to software you don’t use regularly can be disabled
Common safe-to-disable third-party services include
- Adobe Genuine Service — an anti-piracy check that runs constantly; safe to disable
- Apple Mobile Device Service — only needed if you sync an iPhone or iPad
- Bonjour Service — Apple networking service; unnecessary unless you use Apple devices on your network
- NVDisplay.ContainerLocalSystem — NVIDIA’s display container; can be disabled if you don’t use NVIDIA overlay features
- Steam Client Service — only needed when Steam is actually open
Important warning: Never disable a service unless you’ve verified it’s a third-party service with “Hide all Microsoft services” checked. Disabling a core Windows service can cause stability problems. This method is for advanced users who know what they’re looking at.
Method 4: Remove Startup Programs from the Startup Folder
Some programs bypass Task Manager and Settings entirely by placing a shortcut directly in Windows 11’s Startup folder. These are often older programs or scripts — and they won’t show up in the Task Manager startup list at all.
To access the Startup folder:
- Press Windows + R, type shell:startup, and hit Enter
- File Explorer opens directly to your personal Startup folder
- Any shortcut in here will launch at boot
- Simply delete any shortcuts you don’t want running at startup. You’re only deleting the shortcut, not the actual program.
There’s also a separate Startup folder that applies to all users on the PC:
- Press Windows + R, type shell:common startup, and hit Enter
- This folder affects every user account on the machine
This method is particularly useful for finding startup scripts, batch files, or older legacy programs that have embedded themselves outside of Task Manager’s visibility.
Which Startup Programs Should You NEVER Disable?
This is the question most guides skip over, and it’s important. Not everything in the startup list is optional. Here are the ones you should leave enabled:
| Program / Service | Why You Should Keep It |
| Windows Security / Defender | Your antivirus — disabling this leaves you unprotected |
| Windows Audio | Disabling can cause no sound at startup |
| Realtek Audio / Intel HD Audio | Sound card drivers — leave enabled |
| NVIDIA / AMD / Intel Graphics services | GPU drivers — disabling causes display issues |
| OneDrive (if you actively use it) | Disabling means files won’t sync until you open it manually |
| Any VPN client (if you use one for work) | Disabling means your VPN won’t be active at boot |
| Windows Hello / fingerprint service | Needed for biometric login |
| Dropbox / Google Drive (if you rely on sync) | Disabling delays syncing until you open the app |
if you’re not sure what something does, Google it before disabling it. Searching “Is [program name] safe to disable at startup” takes 30 seconds and prevents headaches.
How to Measure Your Boot Time Improvement
After disabling startup programs, there’s a satisfying way to confirm it actually worked. Windows 11 keeps a record of your boot times in the Event Viewer.
Here’s how to check:
- Press Windows + R, type eventvwr.msc, and hit Enter
- Navigate to Applications and Services Logs → Microsoft → Windows → Diagnostics-Performance → Operational
- Look for Event ID 100 — this records how long the last boot took in milliseconds
- Compare your boot times before and after disabling startup programs
Alternatively, a simpler method: use a stopwatch. Time from pressing the power button to the moment your desktop is fully clickable — before and after cleanup. The difference is usually obvious.
Pro Tips to Keep Startup Clean Long-Term
Disabling startup programs is a one-time fix that gradually undoes itself as you install new software. Here’s how to keep your startup list clean going forward:
- Watch installation prompts carefully – Most apps ask during installation whether they should start with Windows. The default is almost always “Yes.” Uncheck it during setup — it’s far easier than finding the setting later.
- Do a quarterly startup audit – Set a reminder every three months to open Task Manager → Startup apps and review what’s accumulated. New software installs quickly add entries to this list.
- Use a standard user account for daily tasks – Many startup programs only register themselves when installed by an administrator account. If you browse and work under a standard account, fewer apps gain permission to add themselves to startup.
- Don’t use RAM-cleaning apps that “optimize startup.” – Tools like Advanced SystemCare, CCleaner’s startup manager, or random RAM booster apps often cause more problems than they solve. The built-in Task Manager and Settings are all you need.
Frequently Asked Questions
No. Disabling a startup program only prevents it from launching automatically when Windows boots. The app remains fully installed and accessible from the Start menu. You can re-enable it at any time.
Yes, safely. OneDrive won’t sync in the background until you open it, but your files are still on the drive and in the cloud. If you rely on OneDrive for work files, you may want to leave it enabled so sync happens automatically.
There’s no magic number, but if you have more than 8–10 programs set to “High” or “Medium” impact, your boot time is likely suffering. Aim to have no more than 3–5 genuinely necessary startup programs.
This usually means the app re-registers itself when you run it. Some apps (especially aggressive ones like Teams or Spotify) reset the startup setting every time they update. The fix is to disable it in the app’s own settings — look for an option like “Launch at startup” or “Open at login” in the app’s preferences.
Go back to Task Manager → Startup apps, right-click the program you disabled, and select Enable. Restart your PC. Everything should return to normal.
Final Thoughts
Startup programs are one of the most common and most overlooked causes of slow Windows 11 performance. The good news is the fix is completely free, takes under 15 minutes, and doesn’t require any technical knowledge beyond what you’ve just read.
Start with Task Manager — disable anything High impact that you don’t genuinely need at boot. Then check the Settings startup list for any toggles you might have missed. If you’re comfortable going deeper, check the Startup folder for hidden shortcut entries.Do this once properly, and your PC will boot noticeably faster. Do it regularly, and it will stay that way.
Related Article- How to Fix High RAM Usage on Windows 11 Without Reinstalling